Hi everyone!
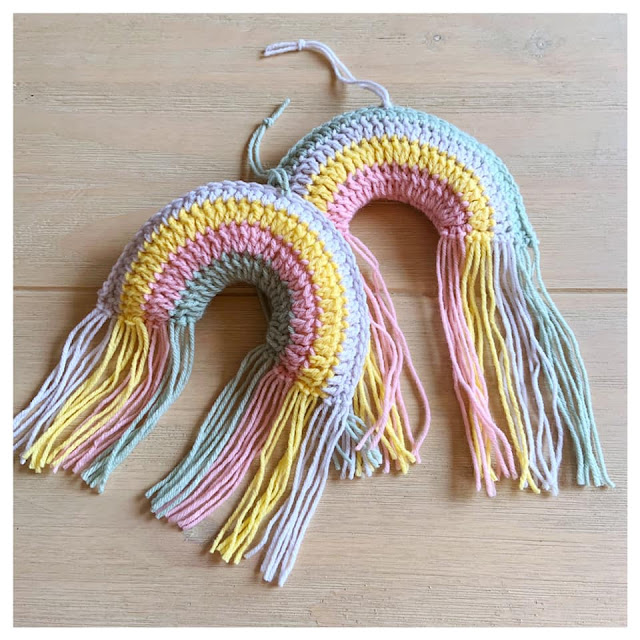
Yep it's time again for a new free crochetpattern! How about some cute mini rainbowhangers?
All you need is some scraps of yarn and some polyester filling.
I have used very soft Baby dk by Paintboxyarns,but you can use any yarn or colour you like;)
(I am not in any way sponsored by Paintboxyarns)
Ok let's get started!
--------------------------------------------------------------------------------------------------------------------------------------------------------------------
Hoi allemaal!
Ik vond het weer eens tijd voor een leuk gratis haakpatroontje! Wat dachten jullie van deze lieve regenboogjes?Je hebt alleen wat restjes garen nodig en wat polyester vulmateriaal.
Ik gebruikte heerlijk zachte Baby dk van Paintboxyarns,maar je kunt natuurlijk ieder garen en kleurtje gebruiken dat je leuk vindt;)
(Ik word niet gesponsord door Paintboxyarns)
Ok ,we gaan beginnen!
--------------------------------------------------------------------------------------------------------------------------------------------------------------------
RAINBOWHANGER CROCHETPATTERN (US terms)
-Choose 4 colours of yarn
I will use the terms ,yarn 1,yarn 2,yarn 3,yarn 4 to let you know when you should change your yarn/colour...
Start with yarn 1:
-Chain 25, make a circle using a slip stitch.
Row 1:
-Chain 2 ( this counts as your first dc), crochet 46 dc into the ring,
end with a slipstitch into the top of your first chain 2 (total 47 dc)
Change to yarn 2:
Row 2:
-Chain 2 (this counts as your first dc), 1dc into the next stitch, 2dc into the next stitch....
continue all the way around with 1dc into 2 following stiches and 2dc into the next stitch.....
End with 1dc in the last 2 following stitches and a sipstich into the top of your first chain 2.
(total 62 dc)
Change to yarn 3:
Row 3:
-Chain 2 ( this counts as your first dc), 1 dc into the next 3 following stitches, 2dc into the next stitch....
continue all the way around with 1dc into 4 following stitches and 2dc into the next stitch....
end with 1 dc in the last 2 following stitches and a slipstitch into the top of your first chain 2.
(total 72 dc)
Change to yarn 4:
Row 4:
-Chain 2 ( this counts as your first dc), 1 dc into every stitch.
End with a slipstitch into the top of your first chain 2.
(total 72 dc)
Don't cut your yarn,as you will continue with this yarn crocheting the top of the rainbow together!
How to get your rainbow in shape;)
*Fold your rainbow, make sure your yarn is on your righthandcorner of the rainbow.
Chain 1 and close the top of the rainbow using sc.
When you have closed the top,cut your yarn and weave in your yarn.
*Fill your rainbow lightly.
*Close the rainbow by sewing through the loops on the inside (see picture).
*Now cut strings of yarn to make the tassels. You need 6 strings of each colour (length approx. 30 cm)
Attach 3 strings of each colours on each side of the rainbow.
Use your crochethook to pull your yarn through, make a loop and pull the yarn through the loop .
(see picture)
Cut your yarn straight to the length you like!
*Attach a piece of yarn into the top to make it into a hanger.
Yeahhhh you did it!! Enjoy your rainbow.....
--------------------------------------------------------------------------------------------------------------------------------------------------------------------
REGENBOOGHANGER HAAKPATROON (NL)
- Kies 4 kleuren garen.
In het patroon spreek ik over kleur 1,kleur 2,kleur 3, kleur 4 wanneer je van kleur moet veranderen.
Begin met kleur 1:
-Haak 25 lossen, maak hier een cirkel van dmv een halve vaste.
Toer 1:
-Haak 2 lossen ( dit telt als je eerste stokje), haak 46 stokjes in de ring en eindig met een hv in de top van je eerste 2 lossen . (totaal 47 stokjes).
Kleur 2:
Toer 2:
-Haak 2 lossen ( dit telt als je eerste stokje ), haak 1 stokje in de volgende steek en 2 stokjes in de daarop volgende steek......
Ga zo door tot je rond bent, dus steeds 2 x 1 stokje in de opeenvolgende steken en dan 2 stokjes in de volgende steek.
Je eindigt met 2x 1 stokje in de laatste 2 steken. Eindig met een hv in de top van je eerste 2 lossen.
(totaal 62 stokjes ).
Kleur 3:
Toer 3:
-Haak 2 lossen ( dit telt als je eerste stokje), haak 3x1 stokje in de drie opeenvolgende steken en 2 stokjes in de volgende steek..........
Ga zo door tot je rond bent, dus steeds 4x 1 stokje in de opeenvolgende steken en dan 2 stokjes in de volgende steek.
Je eindigt met 2x1 stokje in de laatste 2 steken. eindig met een hv in de top van je eerste 2 lossen.
(totaal 74 stokjes)
Kleur 4:
Toer 4:
-Haak 2 lossen ( dit telt als je eerste stokje), haak 1 stokje in iedere steek.
Eindig met een hv in de top van je eerste 2 lossen.
(totaal 74 stokjes)
Hecht je draad niet af want hiermee haak je de top van je regenboog samen.
Hoe geef je je regenboog vorm?
*Vouw je cirkel dubbel ,zodat er een regenboog ontstaat. Zorg ervoor dat je draad van je laatste toer in de rechterhoek zit.
Haak 1 lossen en haak de bovenkant van je regenboog dicht met vasten (1 vaste per steek)
Knip de draad af en werk je draad weg.
*Vul je regenboog lichtjes op.
*Naai de de onderkant van de regenboog dicht(door de lusjes).
*Knip van iedere kleur garen,6 draden van ongeveer 30 cm.
Vouw de draden dubbel en haal ze met haaknaald door de onderkant van je regenboog. (zie foto).
Aan iedere kant heb je drie draden per kleur nodig.
Als je alle draden hebt vastgemaakt kun je ze op gelijke lengte bijknippen.
*Bevestig een draad door de top van je regenboog ,zodat je 'em op kunt hangen.
Jaaaaa je regenbooghanger is klaar! Heel veel plezier ermee........


Leuk idee om ragenbooghangers te maken. Deze staan vast leuk aan een grote tas.
BeantwoordenVerwijderenBedankt voor het patroon.
Groetjes, Margaret
Oh ja dat is ook een heel erg leuk idee!;)xxx
VerwijderenThank you! What hook size do you like?
BeantwoordenVerwijderen