woensdag 29 mei 2019

MOON CROCHETPATTERN FREE - MAAN HAAKPATROON GRATIS


Hi everyone, 
You know what time it is...... it's time for a new free crochetpattern!
This time I have made little moons. They are supereasy and quick!
For this project I have used Cotton Blend Plain by Hobbycraft and a 4mm crochethook, but you can use any yarn you like;)
I have made a little step by step video and below you can find the written pattern.
I hope you will all like it, enjoy!

-------------------------------------------

Hé allemaal,
Ja hoor het is weer tijd voor een nieuw gratis patroontje!
Deze keer maakte ik kleine maantjes met pompoentjes. Het is een heel eenvoudig patroon en een heerlijk snel projectje!
Ik gebruikte Cotton blend Plain van Hobbycraft, dit is niet verkrijgbaar in Nederland ,maar is heel goed te vergelijken met Durable Cosy Fine. Je kunt natuurlijk ieder garen of restje gebruiken dat je nog hebt liggen;)
Ik maakte een stap voor stap video en het geschreven patroontje staat hieronder.
Heel veel haakplezier!

----------------------------------------

MOON CROCHETPATTERN (US terminology)

*chain 5, make a circle using a slipstitch

R1: chain 2(this counts as your first dc),11dc into the ring (12dc)
Close with a ss into the top of your first ch2.

R2: chain 2(this counts as your first dc)+ 2dc into the same space,
then 3dc into every stitch around (36dc)
Close with a ss into the top of your first ch2.

R3:chain 2(this counts as your first dc)+1dc into the same space,
then 2dc into every stitch around (72dc)
Close with a ss into the top of your first ch2.

Don't cut your yarn!

Fold your moon and make sure your yarn is at the top of your moon and chain 1. Now close the outer side of the moon using sc stitches (36sc). Make sure to stuff your moon lightly before you completely close your moon.

Pull a string of yarn through the top of your moon,so it can hang.

Now you have to make three little pompoms (or as many as you fancy!)
Wind your yarn about 30 times around 2 fingers and cut the yarn. Make a knot in the middle and cut the sides open. Make the pompom fluffy by rolling it between your hands.Now cut the pompom into shape.

Attach the pompoms with a needle to your moon in different lengths.
That's it!! Enjoy your lovely little moon!

----------------------------------------

MAAN HAAKPATROON

*haak 5 lossen en maak hier een ring van dmv een halve vaste.

T1: haak 2 lossen( dit telt als je eerste stokje), 11 stokjes in de ring (12 st)
Sluit met een hv in de top van je eerste 2 lossen.

T2: haak 2 lossen( dit telt als je eerste stokje) +2 stokjes in dezelfde ruimte,
dan 3 stokjes in iedere steek tot je rond bent (36 st)
Sluit met een hv in de top van je eerste 2 lossen.

T3: haak 2 lossen(dit telt als je eerste stokje)+1 stokje in dezelfde ruimte,
dan 2 stokjes in iedere steek tot je rond bent (72 st)
Sluit met een hv in de top van je eerste 2 lossen.

Knip je draad niet af!

Vouw je maan dubbel en zorg ervoor dat je draad in de top van je maan zit. Haak 1 losse en sluit de bovenkant van je maan met vasten. (36 v)
vul je maantje licht op voordat je 'em helemaal dichthaakt.

Haal een draadje door de top vzan je maan zodat je deze op kunt hangen.

Nu moetje alleen nog 3 kleine pompoentjes maken. Dit kun je met een pompoentjesmaker doen,maar ik heb het heel eenvoudig rond mijn vinger gedaan;)
Ik heb het garen ongeveer 30x rond 2 vingers gewikkeld. Wikkel een draad rond het bundeltje en knip de zijkanten open. Rol je pompoentje tussen je handen om het een beetje fluffy te maken. Knip de randjes bij om een mooie vorm te krijgen.

Bevestig je pompoentjes met een naald op verschillende hoogtes aan je maan.
En ja hoor,je maan is klaar! Veel plezier ermee!


zaterdag 18 mei 2019

Panda Crochetpattern Free - Gratis Panda Haakpatroon


This weekend it's time again for a cute and free pattern!
Thank you for your lovely responses to the previous rainbowpatterns,
it has been lovely seeing them all on my Instagram!
This time I have designed a little amigurumi pattern.
It's really simple, so even if you are new at amigurumi don't worry you can do this!
Just remember amigurumi works in spirals so you continue to crochet and don't stop after each row! (just make sure to use a stitchmarker!)

--------------------------------------------------------------------

Ok dit weekend is het weer tijd voor een nieuw gezellig en gratis patroontje!
Dankjewel voor al jullie leuke berichtjes op mijn vorige patroontjes, zo leuk om al die regenbogen voorbij te zien komen op Instagram!
Deze keer heb ik een amigurumi patroontje ontworpen.
Het is heel erg eenvoudig ,ook al haak je normaal gezien nooit amigurumi's;)
Gewoon onthouden dat je niet stopt na een toer,maar dat je continue doorhaakt (in spiralen zogezegd), wel even een stekenmarkeerder of draadje gebruiken!

-----------------------------------------------------------------

PANDA CROCHETPATTERN (US CROCHET TERMINOLOGY)

What do you need?

-cotton yarn in white and black.
-crochethook 4 mm /G 6 hook
-tapestry needle
-toystuffing

This pattern starts from the top!

HEAD/BODY:

Start with white:

*chain 2
R1: 6sc into your first chain stitch (6)
R2: 2sc into each stitch , 6x (12)
R3: 2sc in every 3rd stitch, 4x (16)
R4: 2sc in every 4th stitch, 4x (20)
R5: 2sc in every 4th stich, 5x (25)
R6: 2sc in every 5th stitch, 5x (30)
R7: 2sc in every 5th stitch, 6x (36)
R8-10: 1sc in each stitch (36)

Change to black (don't cut your white yarn)

R11: 2sc in every 6th stitch, 6x (42)
R12: 1sc in each stitch (42)
R13: 2sc in every 6th stitch, 7x (49)
R14: 1sc in each stitch (49)

Change back to white (cut your black yarn)

R15: 2sc in every 7th stitch, 7x (56)
R16-R24: 1sc in each stitch (56)
R25: crochet together every 7th + 8th stitch, 7x (49)
R26: crochet together every 6th+7th stitch, 7x (42)
R27: crochet together every 5th+6th stitch, 7x (35)
R28: crochet together every 4th+5th stitch, 7x (28)

Stuff your panda firmly while you go.....

R29: crochet together every 3rd+4th stitch, 7x (21)
R30: crochet together every 2nd+3rd stitch, 7x (14)
R31:crochet together every 1st+2nd stitch, 7x (7)

Cut your yarn,leaving a long tail for closing the bottom of the panda..
Close the panda by pulling your yarn through the last 7 loops with your tapestry needle, weave in the tail.

EARS: (make 2) 
*chain 2
-6 half double crochet stitches into your first chain 1 (6)

Cut your yarn,leaving a tail to sew the ear onto the head.

ARMS: (make 2)
*chain 2
R1:6sc into your first chain stitch (6)
R2-R5: 1sc in each stitch (6)

Cut your yarn,leaving a tail to sew the arm onto the body.

EYES:(make 2)
*chain 2
-into the first chain stitch: 3 half double crochet,1sc,1slipstitch

Cut your yarn,leave a tail to sew the eyes onto the head.

TO FINISH:
-sew the ears on the head
-sew the eyes on the head (approx. on R5-7)
-sew the arms onto the body

Yeahhhhhh you did it!!!

-----------------------------------------------------------------

PANDA HAAKPATROON NL

Wat heb je nodig?
-Wit en zwart haakkatoen
-4mm haaknaald
-borduurnaald
-opvulmateriaal

Dit patroon haak je van boven naar beneden!

HOOFD/LIJF:

Begin met wit:

*haak 2 lossen
T1: haak 6 v in je eerste losse (6)
T2: haak 2 v in iedere v (12)
T3: haak 2 v in iedere 3e v, 4x (16)
T4: haak 2 v in iedere 4e v, 4x (20)
T5: haak 2 v in iedere 4e v, 5x (25)
T6: haak 2 v in iedere 5e v, 5x (30)
T7: haak 2 v in iedere 5e v, 6x (36)
T8-10: haak 1 v in iedere v (36)

Verander naar zwart (knip je witte garen niet af,want daar haak je straks mee door!)

T11: haak 2 v in iedere 6e v,6x (42)
T12: haak 1 v in iedere v (42)
T13: haak 2 v in iedere 6e v, 7x (49)
T14: haak 1 v in iedere v (49)


Verander weer naar wit (zwart mag je afhechten)

T15: haak 2 v in iedere 7e v, 7x (56)
T16-24: haak 1 vaste in iedere v (56)
T25: iedere 7e+8e v samenhaken,7x (49)
T26: iedere 6e+7e v samenhaken,7x (42)
T27: iedere 5e+6e v samenhaken,7x (35)
T28: iedere 4e+5e v samenhaken,7x (28)

Vul je panda op terwijl je aan het haken bent, doe dit zo stevig mogelijk)

T29: iedere 3e+4e v samenhaken,7x (21)
T30: iedere 2e+3e v samenhaken,7x (14)
T31: iedere 1e+2e v samenhaken,7x (7)

Afhechten en een lange draad laten zitten waarmee je de onderkant dichtmaakt, dit doe je door de draad met de borduurnaald door de laatste 7 steken te halen, en toe te trekken.

OORTJES:(maak er 2)
*haak 2 lossen
-haak 6 halve stokjes in je eerste losse.
Hecht af en laat een draad zitten waarmee je het oortje op de panda kunt naaien.

ARMPJES:(maak er 2)
-haak 2 lossen
T1: haak 6 v in de eerste losse (6)
T2-5: haak 1 v in iedere v (6)

Hecht af en laat een lange draad zitten waarmee je het armpje aan de panda kunt naaien.

OGEN:(maak er 2)
*haak 2 lossen
-haak in de eerste losse: 3 halve stokjes, 1 vaste, 1 halve vaste

AFWERKING:
-naai de oren op het hoofd
-naai de armpjes aan het lijf
-naai de ogen op het hoofd ( ongeveer ter hoogte van T5-T7)

Jaaaaaaa,je panda is klaar!!!


maandag 13 mei 2019

RAINBOW KEYCHAIN FREE CROCHETPATTERN - REGENBOOG SLEUTELHANGER GRATIS HAAKPATROON


Hi everyone!
First a big thank you to all of you  for your amazing reactions to my rainbowhanger crochetpattern!
I have seen so many of your makes on Instagram and it gave me the biggest smile....
Yes it's time for a new pattern!!!
I have made these little rainbow keychains, there are supereasy to make and you can use any scraps of yarn you have lying around (and I know you have a lot,lol...)
I have used baby dk by Paintboxyarns (not sponsored), because I like the softness and the sweet colours.
I have used a 4mm crochethook.
Ok let's get started!!!

--------------------------------------------------------------------

Hoi allemaal!
Als eerste wil ik jullie bedanken voor al jullie leuke berichtjes op mijn vorige patroon,de regenbooghanger!
Ik heb zoveel supermooie regenbogen voorbij zien komen op Instagram, echt super....
Nu is het tijd voor een nieuw patroon!!!
Ik heb deze supermakkelijke sleutelhangers ontworpen,die je heel snel van restjes garen kunt maken (en ja,jullie hebben vast, net als ik,heeeeel veel restjes in huis,lol...)
Ik gebruikte baby dk van Paintboxyarns (nee ik word niet gesponsord),omdat dat lekker zacht is en lieve kleurtjes heeft. 
Ik gebruikte een 4mm haaknaald.
Ok genoeg gekletst,aan de slag!!!

-------------------------------------------------------------------
RAINBOWKEYCHAIN CROCHETPATTERN

Choose three colours for your rainbow!

-Make a long chain of 110 chain stitches using your 3 yarns together.

-Take your metal kechain and pull your crochetchain through. Knot your crochetchain together to close your chain.

Now we will crochet our little rainbow!

colour1:
-chain 10, close with a slipstich making a ring.

round 1:
-chain 2 (this doesn't count as a stitch)
-20 hdc into the ring
-close with a slipstitch into the top of your first ch 2 (20 hdc)

Attach colour 2:
-chain 2 (this doesn't count as a stitch)
-1 hdc into the next stitch, 2 hdc into the following stitch, continue like his all the way aound.
-close with a slipstitch in the top of your first ch 2 (30 hdc)

Attach colour 3:
-chain 2 ( this doesn't count as a stitch)
-1 hdc into the next 2 stitches, 2hdc into the following stitch, continue like this all the way around.
-close with a slipstitch in the top of your first ch 2 (40 hdc)
Do not cut your yarn.

Fold your rainbow and make sure your yarn is the righthandcorner.
-ch 1, now close the top of the rainbow using sc stitches (20 sc)
Cut your yarn and weave in the end.

-Sew the inside of the rainbow together.

Attach a peace of yarn into the top of your rainbow and knot your rainbow to your metal keychain.
weave in the ends.

Yeahhhhh your keychain is finished!!!!

--------------------------------------------------------------------
REGENBOOG SLEUTELHANGER HAAKPATROON

Kies 3 kleuren voor je regenboog!

-Haak een ketting van 110 lossen met de 3 kleuren tegelijk.

-Haal je gehaakte ketting door je sleutelhanger en knoop de ketting samen.

Nu is het tijd om je regenboogje te haken!

kleur 1:
-haak 10 lossen en maak hier een ring van dmv een halve vaste.

toer 1:
-haak 2 lossen ( dit telt niet als een steek)
-haak 20 halve stokjes in de ring
-sluit met een halve vaste  in de top van je eerste 2 lossen.
(20 halve stokjes)

Hecht kleur 2 aan:
-haak 2 lossen (dit telt niet als een steek)
-haak 1 half stokje in de volgende steek en 2  halve stokjes in de daaropvolgende steek, ga zo door tot je rond bent.
-sluit met een halve vaste in de top van je eerste 2 lossen. 
(30 halve stokjes)

Hecht kleur 3 aan:
-haak 2 lossen ( dit telt niet als een steek)
-haak 1 half stokje in de 2  opeenvolgende steken en 2 halve stokjes in de daaropvolgende steek, ga zo door tot je rond bent.
-sluit met een halve vaste in de top van je eerste 2 lossen. 
(40 halve stokjes)

Hecht je draad niet af!

Vouw je cirkel dubbel en zorg ervoor dat je draad rechtsonder in de hoek zit.
-haak 1 losse en sluit de bovenboog van je regenboog met vasten 
(20 vasten)
Hecht af en werk je draad weg.

Naai de binnenrand van je regenboog dicht met een borduurnaald.

Bevestig een draad in de bovenkant van je regenboog en maak je regenboog vast aan je sleutelhanger.
werk de draadjes weg in achterkant van je regenboog.

Jaaaaa je bent klaar met je sleutelhanger!!!


dinsdag 7 mei 2019

RAINBOWHANGER FREE CROCHETPATTERN - REGENBOOGHANGER GRATIS HAAKPATROON


Hi everyone!
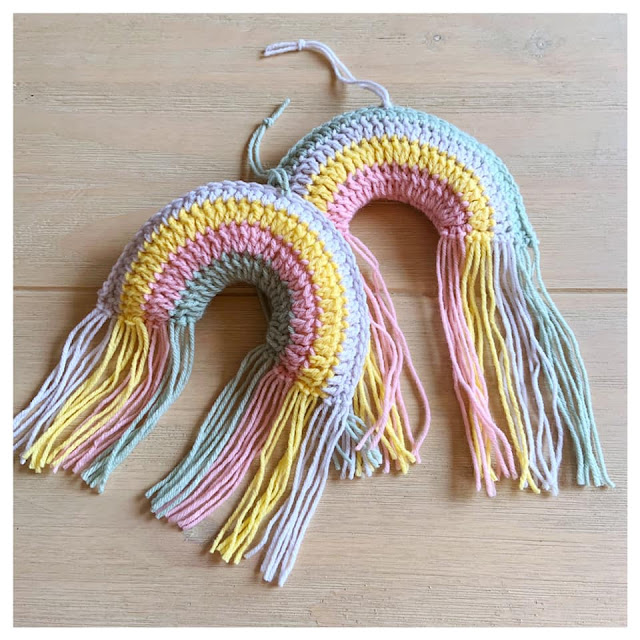
Yep it's time again for a new free crochetpattern! How about some cute mini rainbowhangers?
All you need is some scraps of yarn and some polyester filling.
I have used very soft Baby dk by Paintboxyarns,but you can use any yarn or colour you like;)
(I am not in any way sponsored by Paintboxyarns)
Ok let's get started!

--------------------------------------------------------------------------------------------------------------------------------------------------------------------
Hoi allemaal!
Ik vond het weer eens tijd voor een leuk gratis haakpatroontje! Wat dachten jullie van deze lieve regenboogjes?Je hebt alleen wat restjes garen nodig en wat polyester vulmateriaal.
Ik gebruikte heerlijk zachte Baby dk van Paintboxyarns,maar je kunt natuurlijk ieder garen en kleurtje gebruiken dat je leuk vindt;)
(Ik word niet gesponsord door Paintboxyarns)
Ok ,we gaan beginnen!


--------------------------------------------------------------------------------------------------------------------------------------------------------------------

RAINBOWHANGER CROCHETPATTERN (US terms)

-Choose 4 colours of yarn
I will use the terms ,yarn 1,yarn 2,yarn 3,yarn 4 to let you know when you should change your yarn/colour...

Start with yarn 1:
-Chain 25, make a circle using a slip stitch.

Row 1: 
-Chain 2 ( this counts as your first dc), crochet 46 dc into the ring,
end with a slipstitch into the top of your first chain 2 (total 47 dc)

Change to yarn 2:
Row 2:
-Chain 2 (this counts as your first dc), 1dc into the next stitch, 2dc into the next stitch....
continue all the way around with 1dc into 2 following stiches and 2dc into the next stitch.....

End with 1dc in the last 2 following stitches and a sipstich into the top of your first chain 2.
(total 62 dc)

Change to yarn 3:
Row 3:
-Chain 2 ( this counts as your first dc), 1 dc into the next 3 following stitches, 2dc into the next stitch....
continue all the way around with 1dc into 4 following stitches and 2dc into the next stitch....

end with 1 dc in the last 2 following stitches and a slipstitch into the top of your first chain 2.
(total 72 dc)

Change to yarn 4:
Row 4:
-Chain 2 ( this counts as your first dc), 1 dc into every stitch.
End with a slipstitch into the top of your first chain 2.
(total 72 dc)
Don't cut your yarn,as you will continue with this yarn crocheting the top of the rainbow together!

How to get your rainbow in shape;)

*Fold your rainbow, make sure your yarn is on your righthandcorner of the rainbow.
Chain 1 and close the top of the rainbow using sc.
When you have closed the top,cut your yarn and weave in your yarn.

*Fill your rainbow lightly.

*Close the rainbow by sewing through the loops on the inside (see picture).

*Now cut strings of yarn to make the tassels. You need 6 strings of each colour (length approx. 30 cm)
Attach 3 strings of each colours on each side of the rainbow.
Use  your crochethook to pull your yarn through, make a loop and pull the yarn through the loop .
(see picture)
Cut your yarn straight to the length you like!

*Attach a piece of yarn into the top to make it into a hanger.

Yeahhhh you did it!! Enjoy your rainbow.....

--------------------------------------------------------------------------------------------------------------------------------------------------------------------

REGENBOOGHANGER HAAKPATROON (NL)

- Kies 4 kleuren garen.
In het patroon spreek ik over kleur 1,kleur 2,kleur 3, kleur 4 wanneer je van kleur moet veranderen.

Begin met kleur 1:
-Haak 25 lossen, maak hier een cirkel van dmv een halve vaste.

Toer 1:
-Haak 2 lossen ( dit telt als je eerste stokje), haak 46 stokjes in de ring en eindig met een hv in de top van je eerste 2 lossen . (totaal 47 stokjes).

Kleur 2:
Toer 2:
-Haak 2 lossen ( dit telt als je eerste stokje ), haak 1 stokje in de volgende steek en 2 stokjes in de daarop volgende steek......
Ga zo door tot je rond bent, dus steeds 2 x 1 stokje in de opeenvolgende steken en dan 2 stokjes in de volgende steek.
Je eindigt met 2x 1 stokje in de laatste 2 steken. Eindig met een hv in de top van je eerste 2 lossen.
(totaal 62 stokjes ).

Kleur 3:
Toer 3:
-Haak 2 lossen ( dit telt als je eerste stokje), haak 3x1 stokje in de drie opeenvolgende steken en 2 stokjes in de volgende steek..........
Ga zo door tot je rond bent, dus steeds 4x 1 stokje in de opeenvolgende steken en dan 2 stokjes in de volgende steek.
Je eindigt met 2x1 stokje in de laatste 2 steken. eindig met een hv in de top van je eerste 2 lossen.
(totaal 74 stokjes)

Kleur 4:
Toer 4:
-Haak 2 lossen ( dit telt als je eerste stokje), haak 1 stokje in iedere steek.
Eindig met een hv in de top van je eerste 2 lossen.
(totaal 74 stokjes)
Hecht je draad niet af want hiermee haak je de top van je regenboog samen.

Hoe geef je je regenboog vorm?

*Vouw je cirkel dubbel ,zodat er een regenboog ontstaat. Zorg ervoor dat je draad van je laatste toer in de rechterhoek zit.
Haak 1 lossen en haak de bovenkant van je regenboog dicht met vasten (1 vaste per steek)
Knip de draad af en werk je draad weg.

*Vul je regenboog lichtjes op.

*Naai de de onderkant van de regenboog dicht(door de lusjes).

*Knip van iedere kleur garen,6 draden van ongeveer 30 cm.
Vouw de draden dubbel en haal ze met haaknaald door de onderkant van je regenboog. (zie foto).
Aan iedere kant heb je drie draden per kleur nodig.
Als je alle draden hebt vastgemaakt kun je ze op gelijke lengte bijknippen.

*Bevestig een draad door de top van je regenboog ,zodat je 'em op kunt hangen.

Jaaaaa je regenbooghanger is klaar! Heel veel plezier ermee........


vrijdag 3 mei 2019

YLA Box Brand Rep Unboxing


{dutch only}

Ik ben voor de komende maanden een Brand Rep voor de YLA box!! Zo ontzettend leuk!
Deze week ontving ik mijn eerste box en ik maakte er een unboxing filmpje van!
De box van deze maand heeft een superleuk ontwerp van Den Dennis en onder andere prachtig garen van Durable!
Wil je ook graag een YLA Box ontvangen dan kun je deze kortingcode gebruiken; YLABOXMARTINE10, je krijgt dan éénmalig 10% korting op een YLA Box abonnement!


Mandala ontwerp voor Simply Crochet Magazine - Mandala Design for Simply Crochet Magazine


{eng below}

Ik mocht een mandala ontwerpen voor Simply Crochet Magazine, hoe leuk is dat!!
De naam voor mijn mandala is 'Here comes Spring' omdat het van die heerlijke lentekleurtjes zijn....
Je kunt de mandala terugvinden in nummer 83 van Simply Crochet Magazine!

--------------------------------------------------------------------

I was asked to design a mandala for Simply Crochet Magazine, how cool is that!
The name of my mandala is 'Here comes Spring', because of the sweet Spring colours.....
You can find my pattern in issue 83 of Simply Crochet Magazine!

Lilly het Lente Konijn - Lilly the Spring Bunny


RECTIFICATIE: 

Tijdens het drukproces is er een foutje in het patroon geslopen .
Het gaat om het hoofdje, 
dat moet zijn: 
toer 8- toer 21: 48 vasten.


{eng below}
Het is tijd om mijn blog weer eens up to date te brengen.
Alweer een poosje geleden mocht ik meewerken aan een heel erg leuk haakboekje; 
Pasen en Lente haaksels!!
Het is een boekje waarin 10 haakbloggers een eigen ontwerp laten zien. Dit was mijn bijdrage voor het boekje: Lilly het lente konijn. (maar ze is ook heel schattig in de zomer, herfst of winter hoor, hihi)
Het boekje is te bestellen via Freubelweb!

---------------------------------------------------------------
Hi ladies, 
It's time to update my blog, because it has been a while, oops......
A while ago I was asked if I would like to contribute to a little crochetbook! How lovely!
10 crochetbloggers show their designs of in this sweet book.
This is my design for the book; Lilly the Spring bunny ( though she will be cute through all the seasons,lol)
You can order your copy through Freubelweb! (sorry,Dutch only......)

vrijdag 8 maart 2019

Konijn Applicatie Haakpatroon - Bunny Applique Crochetpattern


 Hoi allemaal, 

Alweer een poos geleden maakte ik dit konijntje! Het is een supersimpel patroontje, in het filmpje hieronder kun je meehaken. Ik heb ook het patroontje hieronder opgeschreven dus als het filmpje te snel gaat,kun je altijd het patroon nog even nachecken;)
Veel haakplezier allemaal!x

---------------------------------------------------------------

Hi everyone, 

Are you getting ready for Easter? I have made this little bunny applique already a while ago, but I thought it was time to share it again with you........
You can find the written pattern below. (the video is dutch only,but it will still show you the different steps.....)
I hope you will enjoy the pattern!x


Patroon Konijntje

Lichaam:
*haak 5 lossen en maak hier een ringetje van door het haken van een halve vaste in je eerste losse.
Toer1:
*haak 3 lossen 
*haak 9 stokjes in de ring (9)
*sluit met een halve vaste in de top van je eerste 3 lossen

Toer 2:
*haak 1 losse
*haak steeds 2 vasten in iedere steek ( in iedere top van je stokje,zie video) (18)
*sluit met een halve vaste in je eerste losse

Kop:
*haak 3 lossen
*haak 3x een half stokje in de steek onder je 3 lossen ( dus steeds in dezelfde steek)

Oren:
*haak 7 lossen
*haak een half stokje in de 3e steek vanaf de haaknaald
*haak een half stokje in ieder van de volgende 4 steken ( in totaal heb je 5 halve stokjes)
*zet het eerste oor vast met een halve vaste in de eerste steek achter de kop ( op het lichaam)

*doe hetzelfde voor het 2e oor en zet dit oor ook vast met een halve vaste in dezelfde steek als het eerste oor.

Maak nu nog een leuk pompoentje voor het staartje van je konijntje!

--------------------------------------------------------
Bunny pattern (US terminology)

Body:
*chain 5 , make a ring using a slipstitch

Round 1:
*chain 3
*crochet 9 dc in the ring (9)
*close with a slipstitch in the top of your first chain 3

Round 2;
*chain 1
*crochet 2 sc in the top every dc of your last round (18)
*close with a slipstitch in your first chain 1.

Don't cut your yarn
Head:
*chain 3
*crochet a hdc in the space under your chain 3 (see video)
*crochet 2 more hdc in the same space (total of 3 hdc in the same space)

Ears:
*chain 7
* crochet a hdc in the 3rd chain from the hook
* crochet a hdc in each of the next 4 stitches ( you will have a total of 5 hdc)
*attach your first ear with a slipstitch in the first stitch behind the head (on the body)

*for the next ear repeat the same steps and attach ear 2 in the same space behind the head.

Now make a cute little pompom and finish your bunny!